Friday, August 16, 2013

IMHO the new GMail compose window is ridiculous - GMail Alternative short list

IMHO the new compose window in GMail is ridiculous...
Today I started thinking about alternative service, so I thought "I'll make a short list of GMail alternative, and I'll post it to Google Plus"

And the thing started to become even more ridiculous... :-)


I tried to pose the following text on G+,

About the new GMail Compose Window... It's ridiculous.
Google is really going beyond the limits :-(

I've just compiled a short list of GMail Alternative, just in case.
I've never been so near at trashing GMail :-(
And That's sad, because there was a time when GMail was the coolest email account... but maybe that those days are finally gone.

Anyway, here is my the Gmail Alternative short list:

http://www.gmx.com/
https://www.zoho.com/mail/
http://www.mail.com/
http://shortmail.com/
http://www.inbox.com/
http://mail.yandex.com/
http://www.hushmail.com/
http://outlook.com/
http://yahoo.com/

Feel free to add other alternatives in the comments :-)
And guess what?
I got a fancy message saying that "This post violates our policies; it's visible only to you" I cant believe it... whats wrong with this post? maybe too many links? :-)


Yes, there was too many links...
But now it seem that I've been able to post this without links, and then I've added back the links by editing the post after sharing :-)


Finally I made it, the second post on G+ is now visible, with all the links :-)

Happy GMail Alternative testing to everyone :-)

Saturday, June 1, 2013

Synology DS213j: review and power consumption test with WD RED 3Tb HDD

I was looking at Synology Nas from long time.
I knew that if I waited enough, they would release the right Nas, with the right spec, at the right price.
And 2 weeks ago this time went. And I placed an order for my new Nas, the Synology DS213j.
I also ordered the HDD for the Nas: 2 Western Digital RED 3Tb HDD (WD30EFRX).

Why the DS213j?
  • because i need an external backup
  • because the price is good
  • because it consume 3.65W in HDD hibernation
  • because it's powerful
  • because it have 512Mb of Ram
  • because I like the DSM (Disk Station Manager, the OS of the Synology Nas) and all it's addons, especially:

Here is the Synology DS213j, in all its glory :-)

Synology Disk Station DS213j Review photos, benchmark, and power consumption testSynology Disk Station DS213j Review photos, benchmark, and power consumption test


Synology Disk Station DS213j Review photos, benchmark, and power consumption testSynology Disk Station DS213j Review photos, benchmark, and power consumption test

Now, one of the reason that pushed me toward the DS213j was one of its specs: a power consumption of 19W when working, and a very low power of 3.65W in HDD hibernation.
The 3.65W in HDD hibernation is very important, because I use my home PC mainly in the evening (19..24) so for the big part of the day (00..19) the NAS will be sitting idle.
Now, if the NAS is powered on 24h/day, even a tiny power consumption will build up.

So, based on my utilization profile, I can calculate the impact on the electricity bill.

Let's try to asses how much will cost to run a DS213j 24h/day for a year.

For each day I have about 5 hours of active utilization, and 19 hours of Nas sitting idle.
lets say 6 vs 18 hours (using a HDD hibernation delay of 1 hour)

So, for the normal working days, we have
1 day power = 6h*19w + 18h*3.65w =  114wh + 65.7wh = 179.7wh / day

But in the week end I spend more time with my PC, so it will be more something like
1 day power = 16h*19w + 8h*3.65w =   333 wh /day

In a year this will build up to:
1 year power = 333wh * 104d + 180wh *261d = 35kwh + 47kwh = 82kwh

You can't ignore 82kwh / year.

The electricity, in Italy, is between 0.2€/kwh and 0.4/kwh (depending on contract), so 82kwh/year will set you back between 16.4€ and 32.8€ / year
Having a NAS that consume about 3.65w during HDD hibernation is beneficial for the electricity bill :-)

About the HDD choice
I bought 2 Western Digital RED 3Tb HDD (WD30EFRX), to use in RAID 1 configuration.
These drives have some advantage over the competition:
  • they are built specifically for NAS usage
  • they consume a bit less than the others WDC models (4.6W read/write, 4.1W idle, 0.6w standby)
  • they are sufficiently cheap

The testing setup
Synology Disk Station DS213j Review photos, benchmark, and power consumption test
The PC (i7-3770k overclocked @4.5Ghz, 16Gb ram, ASUS P8Z77-V Deluxe, SSD Intel 520, bla-bla-bla-yada-yada.... :-) ) and the NAS are connected via a Netgear WNDR 3700v2 gigabit router (not shown in the photo, it's hidden over the furniture :-) ).

The DS213j power consumption test.


The testing equipment is a cheap power meter, that can measure consumption up to 2000w, so I wont  expect a 0.1w precision in the 0w to 20w range... anyway, it's better than nothing :-)

DS213j power consumption during boot process: it oscillate between 5w and 16w
Synology Disk Station DS213j Review photos, benchmark, and power consumption testSynology Disk Station DS213j Review photos, benchmark, and power consumption test


DS213j power consumption at idle, just after booting the Nas: it's stable at 15w
You can see the nas doing nothing, just logged in DSM
Synology Disk Station DS213j Review photos, DSM, benchmark, and power consumption testSynology Disk Station DS213j Review photos, DSM, benchmark, and power consumption test

DS213j power consumption during data reading operation: it's stable at 16w
In the screenshot you can see the statistics in the DSM, I was copying a single big 10Gb file from the Nas to my PC, the data is being copied at a rate of about 71Mb/s.

Synology Disk Station DS213j Review photos, DSM, benchmark, and power consumption testSynology Disk Station DS213j Review photos, DSM, benchmark, and power consumption test


DS213j power consumption during data writing operation: the power consumption is stable at 17w.
In the screenshot you can see the statistics in the DSM. I was copying the same 10Gb file from my PC to the Nas. The file is being copied at a rate of about 64Mb/s. (I made my test with HDD write cache disabled, enabling write cache may enhance performance)
Synology Disk Station DS213j Review photos, DSM, benchmark, and power consumption testSynology Disk Station DS213j Review photos, DSM, benchmark, and power consumption test


 Finally, DS213j power consumption during HDD Hibernation: ...wait for it... wait  for it... 4w!
Synology Disk Station DS213j Review photos, DSM, benchmark, and power consumption test
Eureka! It works (as expected)! Just 4w!
My power meter have a 1w precision... so I will simply assume that the Synology specification are correct about the 3.65w consumption during HDD Hibernation)
Here I don't have a DSM screenshot for the HDD in hibernation state, because accessing the DSM will wake up the HDD.


Additional power consumption testing

Power consumption during a scheduled  Power Off
As requested by a commenter, I've tested the power consumption during a scheduled power off.
After a scheduled power off the DS213j consume 0W , so it's effectively turned off.
Keep in mind that a scheduled power off will have a bit of delay.
On my DS213j, when I schedule a power-off at 15:00, the DS213j will effectively power-off at 15:01.47, about 1 minute and 47 seconds later than the scheduled power-off .
Instead, if you request a power off with the Nas GUI, it will effectively shut-down in about 47 seconds.

Power consumption and Wake On Lan (WOL)
On DS213j you can activate the WakeOnLan function.
When the WOL function is active you can Power On your DS213j via the network.
If the WOL function is active, and the DS213j is powered off, the power consumption is still 0W.
(Well... some time the power consumption have a short spike to 1w or 2w for about 1 sec, but this happen every 2/3/4 minutes... with my power meter I cant do a better analysis of the phenomenon. Anyway, this may be totally unrelated to the WOL feature.)
After activating the WOL function I used a free utility (Depicus wolcmd command line) to test it, and the Wake On Lan worked perfectly.


DS213j FAQ, Tips, Tricks... & Quirks

How much time will take a backup?
My first full backup (850Gb of data on more than 700'000 files.) took about 10 hours. I made it using SyncBack. Your mileage will vary wildly (depending on files size, files count, software used...).

How much time take to sync data with Cloudstation?
I started today to use Cloudstation to sync about 8.5Gb of data (about 18'000 files) it took about 6 hours to sync (upload) all the data from my PC to the NAS. Your mileage may vary.
The maximum Cloudstation upload speed I've seen (from PC to NAS) is about 8Mb/s, when transfering a single very big file (2Gb).
Update: After updating the nas to DSM v4.3 the Cloudstation got faster, now it upload data (from PC to NAS) at about 11Mb/sec (on very big files).

How much space will use the Cloudstation sync service?
If my preliminar understanding are correct, it take AT LEAST two times the size of the data you want to sync.
Do you want to sync 10Gb of data? For these 10Gb of data, Cloudstation will employ at least 20Gb of disk space on the NAS.
But It can use much more than 20Gb of  space, because by default Cloudstation save the last 32 versions of any synced file. So If you edit often a 100Mb file, this may occupy up to 100Mb*32 = 3.2Gb of space on the NAS.

Why the free space on the NAS doesen't increase when you delete some files?
If these file are these file synced via Cloudstation, you need to remove the file from the cloudstation history/recycle bin.
Log in the NAS using the account of the user using the sync service (the admin user wont works), then: Open CloudStation, open the Recycle bin, Select the synced shared folder, and remove the old files.

Why the free space on the NAS, still, doesn't increase when you delete some files?
Are the deleted files in a shared folder that have the recycle bin enabled?
Log in  in the NAS as administrator, open control panel, open the shared folder list, then click "Action" and you'll be able to click "Empty all recycle bins" (for all shared folders) .

TimeBackup: dedicated volume required
The TimeBackup package WILL NEED a "dedicated" volume as a destination for your backup.
You CAN'T use the TimeAckup to backup MyShare on Volumne1 to MyTimedBackupShare on Vloume1. If MyTimedBackupShare is the destination of your TimeBackup, it will need to be on a different volume (Volume2, Volume3...)
This have some implications: you will need to do a planing, do some test, and decide beforehand how much space you are going to dedicate to the TimeBackup function, then  you will create a volume of the needed size.
I used 3Tb HDD in Raid 1, these are effectively about 2780Gb of total space.
I've create a Volume1 of 2000Gb, and a Volume2 of 780Gb.
The Volume1 will contain the shared folder for my data.
The Volume2 will contain the shared folder I will use as a destination of the TimeBackup function.

You CAN'T shrink a volume
On Synology DSM, you can grow a volume (if you have free space) but you CAN'T shrink a volume.
So, I have 2 volumes: Volume1 = 2000Gb, and volume2 = 780Gb.
If I want to grow Volume1, The only way is to delete volume2, then grow volume1, then recreate volume2. You CAN'T shrink volume2, even is it's totally free and unused.
This mean that if you want to use the TimeBackup function, you need to think carefully about how to size your volumes.

Wake On Lan function after a blackout
During my testing I discovered a tiny quirk of the WOL feature.
If you power-off the DS213j 'normally' (by the GUI, or by the button) the WOL function will work perfectly.
But if the DS213j is powered off, and you detach it from the power, the WOL function get 'deactivated', and wont work. In this situation, to power on the DS213j, you need to push the button.
Clearly the WOL function still use a very tiny bit of power, and unplugging the power cable disable the WOL function.
To sum it up: the WakeOnLan function wont work after a blackout :-)


Additional speed testing over WiFi/Smartphone
I've tested the files transfer speed between the Nas and a smartphone over a WiFi network.
  • Smartphone: Samsung Galaxy S4
  • Router: Netgear WNDR3700v2
  • WiFi: 5GHz,  WPA2/PSK
  • The Galaxy S4 link speed: 150Mbps.
  • The Galaxy S4 distance from the router: less than 2 meters
  • The NAS is connected to the router one a Gigabit Lan port
The test: I downloaded 6,89 Gbytes of data (1534 files) from the Nas to the internal memory of the Galaxy S4 using the DSFile App.
The DSFile App is setup to use an HTTP connection.

The files got transferred to the phone in about 1427 sec, the mean download speed is 4,95 MBytes/sec
I think this is s not bad at all, after considering that it's a real data-transfer speed over WiFi for a smartphone.
The network transfer speed reported y the Nas Resorce Manager oscillated between 2MBytes/sec and 8MBytes/sec.
The maximum speed is clearly limited by the WiFi connection, and/or by the smartphone.


Conclusion
I'm very happy about my brand new DS213j, I love the DSM and it's packages.
I'm also very happy about the HDD choice, using a pair of 3Tb WD RED the maximum power consumption is about 17W when writing, 15W when idle, and less than 4W during HDD hibernation.
Exactly what I was expecting :-)

If you have any questions about the DS213j: feel free to ask. :-)

Friday, March 22, 2013

Eclipse: Create project from existing source - How to import existing Java/Android Project into Eclipse

It seem that a lot of material on the internet, and even some Android books, refer to a mystical "Create project from existing source" option of the new project wizard in Eclipse.
I didn't know how Eclipse looked in the past, but now, in Eclipse Juno, there is no such option.
But you can still "Create project from existing source", and I'll show you how to do it :-)

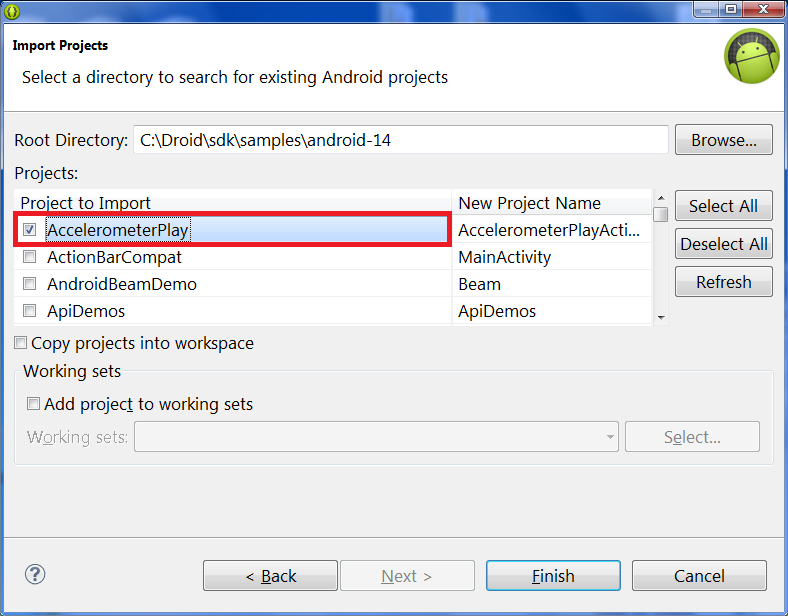
I created a simple step-by-step visual guide about how to create a new project from existing source.
In this guide I've used Eclipse Juno (from the Android SDK)


1) Start Eclipse and open a new/empty workspace 


2) Click the Import command, in the File menu


3) Choose "Android\Existing Android Code Into Workspace" and click "Next"


4) The following screen will appear, we need to insert the folder path of the source files we want to use as base for our new project: we can use the "Browse" button or...


5) We can simply Copy/Paste the path of our source files :-)


6) Paste the path of our source project folder


7) Click the "Refresh" button: this will update the list of source project(s)


8) Eureka! Now we have the list of our much wanted source project(s)


9) Now, don't be hungry, click the "Deselect All" button, to uncheck all the projects


10) and now select the project you really want. I'll go for the AccelerometerPlay, I always liked the interesting things you can do with modern smartphone sensors... :-)


11) Check the option "Copy projects into workspace" so you'll work on a copy of the original project. It's best to not mess up with the original SDK samples, you never know when you'll need them again :-)


12) Click "Finish" aaaaand....


13) You are done! Welcome your new project freshly copied from the SDK source :-)


P.S.: Can you guess that the first programming language I learned was Borland Turbo Pascal 5?
The blue background IDE of those good old days left a sign in my infancy... and even 22 years after, I still feel at home with a dark blue background, yellow keywords, and white identifiers! :-)


In case you like it, here is a link to my Eclipse color theme (MaxDarkBlue Eclipse theme), It's a work in progress... but for my eyes it seem better that other themes I've checked :-)

Thursday, March 14, 2013

WHAT? NO MORE GOOGLE READER? Google: ARE YOU CRAZY?

I just acknowledged that from 1 July 2013 Google is dismissing Google Reader.

http://googlesystem.blogspot.it/2013/03/no-more-google-reader.html

WHAT? NO MORE GOOGLE READER?
Google: ARE YOU CRAZY?
How I'm supposed to keep up with the news?

Google reader changed the way I search for news!
Google reader changed the way I surf the web.
With Google reader I can look efficiently at an enormous amount of news, all in one place.

Hey Google, do you really mean that I need to back to the old habit of opening a website, looks for news, open another website, looks for news.... but, hey, I have more than 500 RSS feed in my Google reader, How Can I open 500 website? I can't...

So, not having Google Reader will slow down by a a factor of no less than 10 my ability to surf the news, to surf the net, to keep up with interesting things...

Google reader is 100% news, 100% interesting things, 100% efficiency!
And Google is trowing that out of the window... :-(

This is so sad.

Once upon a time I was using an offline feed reader, it was not bad... but then I discovered Google reader, so much faster, so much better!

Do I really need to find another offline RSS feed reader? does they still exist?

Why are you doing that Google? WHY?!?

Please, please, please, keep Google Reader running!


Thursday, March 7, 2013

How to split a comma separated string and loop it's values in SQL Server

Here is a simple T-SQL script for SQL Server that will split a comma separated string and loop on the values.
It's a simple way to create a array/list of things in SQL Server, and then do something on the values of the list.
These values can be anything: table names, stored procedures, query...

Application note:  the value list string must end with a comma ","
I've update the code to work even with a value list that doesn't have a trailing comma

DECLARE @valueList varchar(8000)
DECLARE @pos INT
DECLARE @len INT
DECLARE @value varchar(8000)

SET @valueList = 'aa,bb,cc,f,sduygfdctys,w,e,r,t,sd sdf sdf,yyy yyy yy,'

--the value list string must end with a comma ','
--so, if the last comma it's not there, the following IF will add a trailing comma to the value list
IF @valueList NOT LIKE '%,'
BEGIN
    set @valueList = @valueList + ','
END


set @pos = 0
set @len = 0

WHILE CHARINDEX(',', @valueList, @pos+1)>0
BEGIN
    set @len = CHARINDEX(',', @valueList, @pos+1) - @pos
    set @value = SUBSTRING(@valueList, @pos, @len)
    --SELECT @pos, @len, @value /*this is here for debugging*/
        
    PRINT @value
    --Here is you value
    --DO YOUR STUFF HERE
    --DO YOUR STUFF HERE
    --DO YOUR STUFF HERE
    --DO YOUR STUFF HERE
    --DO YOUR STUFF HERE

    set @pos = CHARINDEX(',', @valueList, @pos+@len) +1
END


The output of this script is:

    aa
    bb
    cc
    f
    sduygfdctys
    w
    e
    r
    t
    sd sdf sdf
    yyy yyy yy


SQL Code colored with this syntax highlighter

How to rebuild all index on all tables in a SQL Server database

This code will rebuild all indexes on all tables of the current SQL Server DB (without changing the fill factor)
 
Here is the T-SQL code:
DECLARE @tbName varchar(255)

DECLARE tbCursor CURSOR FOR
    SELECT table_name FROM information_schema.tables
    WHERE table_type = 'base table'

OPEN tbCursor

FETCH NEXT FROM tbCursor INTO @tbName
    WHILE @@FETCH_STATUS = 0
    BEGIN
        PRINT 'rebuilding all indexes on ' + @tbName
        DBCC DBREINDEX (@tbName,' ',0) WITH NO_INFOMSGS 
        FETCH NEXT FROM tbCursor INTO @tbName
    END
CLOSE tbCursor

DEALLOCATE tbCursor

The source for this code is in the comments of this blog post
I just changed the code a bit, and color-coded it for easier reading  (using this highlighter)

Monday, January 21, 2013

Teardown: Roomba wheel assembly taken apart - Hair/debris cleaning - Roomba 760, 770, 780

Today I was preparing my Roomba 780 for it's weekly home-cleaning job... and I noticed that the left wheel was very stiff.
I searched online for some solution, or some disassembling guide.
I found nothing usefull, so I'm going to report here my experience in Roomba wheel assembly dismounting, cleaning from debris/hair, and reassembly.

I suspect this is the kind of issue that precede a broken wheel motor and/or a roomba continuously circling due to a stuck wheel...

So... here we go! :-)

Place your Roomba upside down.
  1. twist off the 4 circled screw
  2. remove the battery cover
  3. remove the battery
  4. remove the brush (and re-twist it's screw to not lose it)
  5. remove the front wheel


Here is our Roomba ready for disassembling.
Gently pull up the bottom plastic cover.

And now we have a bottom-naked roomba.

Here is a detail of the left wheel, the one I need to fix.
Remove the 3 circled screws.
The right screw will come off, the 2 left screws won't come off (on my unit).

Some other image of the still mounted roomba left wheel assembly


After twisting off the 3 screws, you can pull out the wheel assembly.
Here is the, now empty, "slot" of the wheel assembly.

Here are some images of the wheel assembly form different points of view.


Now, let's take it apart.
You should try to unhook the spring before twisting off the 3 circled screws.
I didn't unhook the spring during my disassembly, the hooked spring made the disassembly a little harder.
Pay attention to the spring, it's very strong, and it's hooked to tiny plastic hooks.


Here is the spring, and the 3 screws of the wheel assembly.

Dismantled wheel assembly.
The electrical connector is in the lower part, and it's connected to the motor with some wire.


Here you can see the switch that detect if the roomba is placed on a floor (wheel pushed inside by the roomba weight when on floor) or not (wheel pulled outside by the spring).

Here you can see the wiring from the switch to the connector.
Squared in white, you can see 2 tiny metal pins: they are holding the connector in place.
You should gently push them out with the tip of a tiny screwdriver.
Use the screwdriver even to pull out the wire of the switch.

Here is the lower part of the wheel assembly... naked.

and here is a detail of the part that hold the electrical connector, you can see 2 holes for the 2 pins that hold the connector in place.

And here we have the top part of the assembly, with the dismounted electrical part.

Now here is the tough part.
Disassemble the wheel gear box.

There are 6 screws that hold the gearbox together.
The 4 white circled screw hold the two pieces of the gearbox. These 4 screws were very tight.
The 2 black circled screws keep the electrical motor attached to the gearbox.


But the tough part is not the gearbox, but the pin that hold the grey gearbox to the blue wheel assembly.
This big pin is fitted in the blue plastic, and in fact is the articulated joint that allow the wheel to move up and down.

The only way to push the pin out is by using brute force, a screwdriver and a hammer.
Update: an anonymous commenter suggested that it may be a lot easier to push the pin out in the opposite direction. It's better you try to push the pin on both side, justo to see if there is an easier side. Maybe I hammered the pin out the wrong side :-)

Find a good place, and start hammering the pin out.
Here you can see the pin coming out.
...after some minutes of hammering...

...now I can use the pliers to finish the job.

and here we have it: finally the gearbox is detached from his articulation.

Eureka: dismantled gearbox!


Removed some gears.
And now what?
Well... at this point I've learned that I can't dismantle any further, the wheel and it's gear are firmly locked on their axis.
But at least I can turn the wheel without the fear of breaking the gears :-)

Now that I've ruled out the possibility that there was something wrong in the gearbox... let's try to clean the pin of the wheel.
I've used some paperclips to create some hooks, to take out the debris and the hair.


Here you can see a mix of debris and hair... there was a lot of them.

After taking out a lot of debris, the wheel was still very stiff...
The space you have to work with is very small, nothing bigger than 1mm can enter between the wheel and it's case.

So I decided to go for a more radical route :-)
After looking carefully at the wheel, I marked the internal reinforcement ribs, and then...

Pierce all the wheels!


mmmh... let me see...
...I'm still too far from the debris/hair...

...after drilling another hole...

...now I can clearly see the debris!

Some more cutting... and now my roomba have lightened wheels , like a sport car :-)
And using some bended paperclip I can finally clean it for true.

There were A LOT of hair/debris near the axis of the wheel.

After cleaning, it's time to remount everything up.
I've created a long hook for the spring...
...so place the spring...
...and hook it back in place...


Finally, some tape to close the hole of my brand new roomba lightened wheel :-)


Put the wheel assembly back in the roomba and...


...huston, we have a problem!
I wasn't able to reput the wheel articulation pin fully back in place (see the squared pin in the following image)

and the not-in-place pin conflicted with the pin-holder on bottom-cover of the roomba
The Roomba engeneers placed a pin holder on the bottom, like if there was any possibility that the pin could slip out of place by itself... I mean, it took me much effort and many dozens of hammer strokes to push out the pin... in this universe there is no way this pin could slip out by itself :-)

So, let's do some roomba-bottom-cover modding :-)

Before the modding:

After modding with cutter :-)
Nothing will stop me from putting everything back in place :-)

Now my roomba is assembled back together, and is once again going strong! :-)

This Roomba wheel assembly cleaning operations took me between 3 and 4 hours.
Now the wheel is spinning better, it's not as good as the other wheel, but its much better than before cleaning.
Update: after cleaning some rooms with my roomba, now the cleaned wheel spin very well, it seem to be even smoother than the right wheel.
After all this wheel assembly cleaning operation worked exactly as intended :-)


My roomba model is Roomba 780, but from the image I find online it seem that this wheel assembly module is the same on Roomba 500/600/700 series (Roomba 530 555 560 570 580 620,780, 770, 760)
My roomba is about 13 month old, I use it every week in my home, each week it clean about 5 rooms.

As you may guess, I hate poorly documented guide...I believe that if you are going to make a guide/howto about dismount something, having a lot of Hi-reslutions image is going to help a lot.(you can click any image to see it bigger, or you can CTRL-click any image to see it full-res)
Now, anyone can see what it take to dismount a roomba wheel :-)

If you have a stuck roomba wheel, before deciding to trash it, maybe you can simply try to make 1 or 2 hole in it, and try to clean it's axis :-)
If you can turn the wheel by hand, maybe you can even clean the wheel without dismounting it at all (now that I've dismounted it, I know that :-)

I hope this series of image can be useful to the brave that will venture in the roomba wheel assembly dismounting :-)