I searched online for some solution, or some disassembling guide.
I found nothing usefull, so I'm going to report here my experience in Roomba wheel assembly dismounting, cleaning from debris/hair, and reassembly.
I suspect this is the kind of issue that precede a broken wheel motor and/or a roomba continuously circling due to a stuck wheel...
So... here we go! :-)
Place your Roomba upside down.
- twist off the 4 circled screw
- remove the battery cover
- remove the battery
- remove the brush (and re-twist it's screw to not lose it)
- remove the front wheel
Here is our Roomba ready for disassembling.
Gently pull up the bottom plastic cover.
And now we have a bottom-naked roomba.
Here is a detail of the left wheel, the one I need to fix.
Remove the 3 circled screws.
The right screw will come off, the 2 left screws won't come off (on my unit).
Some other image of the still mounted roomba left wheel assembly
After twisting off the 3 screws, you can pull out the wheel assembly.
Here is the, now empty, "slot" of the wheel assembly.
Here are some images of the wheel assembly form different points of view.
Now, let's take it apart.
You should try to unhook the spring before twisting off the 3 circled screws.
I didn't unhook the spring during my disassembly, the hooked spring made the disassembly a little harder.
Pay attention to the spring, it's very strong, and it's hooked to tiny plastic hooks.
Here is the spring, and the 3 screws of the wheel assembly.
Dismantled wheel assembly.
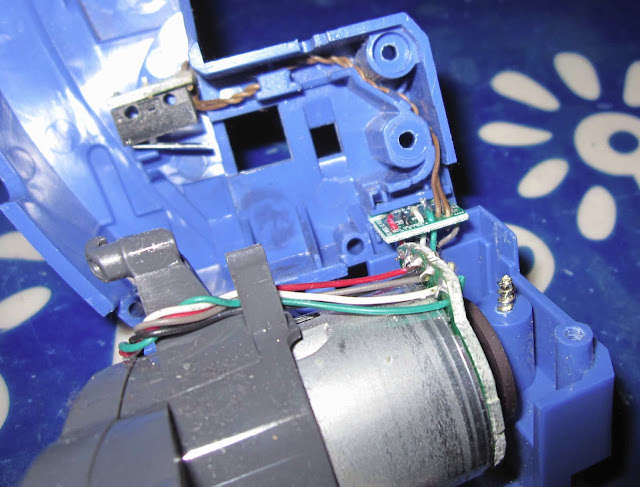
The electrical connector is in the lower part, and it's connected to the motor with some wire.
Here you can see the switch that detect if the roomba is placed on a floor (wheel pushed inside by the roomba weight when on floor) or not (wheel pulled outside by the spring).
Here you can see the wiring from the switch to the connector.
Squared in white, you can see 2 tiny metal pins: they are holding the connector in place.
You should gently push them out with the tip of a tiny screwdriver.
Use the screwdriver even to pull out the wire of the switch.
Here is the lower part of the wheel assembly... naked.
and here is a detail of the part that hold the electrical connector, you can see 2 holes for the 2 pins that hold the connector in place.
And here we have the top part of the assembly, with the dismounted electrical part.
Now here is the tough part.
Disassemble the wheel gear box.
There are 6 screws that hold the gearbox together.
The 4 white circled screw hold the two pieces of the gearbox. These 4 screws were very tight.
The 2 black circled screws keep the electrical motor attached to the gearbox.
But the tough part is not the gearbox, but the pin that hold the grey gearbox to the blue wheel assembly.
This big pin is fitted in the blue plastic, and in fact is the articulated joint that allow the wheel to move up and down.
The only way to push the pin out is by using brute force, a screwdriver and a hammer.
Update: an anonymous commenter suggested that it may be a lot easier to push the pin out in the opposite direction. It's better you try to push the pin on both side, justo to see if there is an easier side. Maybe I hammered the pin out the wrong side :-)
Find a good place, and start hammering the pin out.
Here you can see the pin coming out.
...after some minutes of hammering...
...now I can use the pliers to finish the job.
and here we have it: finally the gearbox is detached from his articulation.
Eureka: dismantled gearbox!
Removed some gears.
And now what?
Well... at this point I've learned that I can't dismantle any further, the wheel and it's gear are firmly locked on their axis.
But at least I can turn the wheel without the fear of breaking the gears :-)
Now that I've ruled out the possibility that there was something wrong in the gearbox... let's try to clean the pin of the wheel.
I've used some paperclips to create some hooks, to take out the debris and the hair.
Here you can see a mix of debris and hair... there was a lot of them.
After taking out a lot of debris, the wheel was still very stiff...
The space you have to work with is very small, nothing bigger than 1mm can enter between the wheel and it's case.
So I decided to go for a more radical route :-)
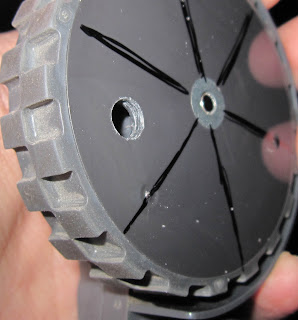
After looking carefully at the wheel, I marked the internal reinforcement ribs, and then...
mmmh... let me see...
...I'm still too far from the debris/hair...
...after drilling another hole...
...now I can clearly see the debris!
Some more cutting... and now my roomba have lightened wheels , like a sport car :-)
And using some bended paperclip I can finally clean it for true.
There were A LOT of hair/debris near the axis of the wheel.
After cleaning, it's time to remount everything up.
I've created a long hook for the spring...
...so place the spring...
...and hook it back in place...
Finally, some tape to close the hole of my brand new roomba lightened wheel :-)
Put the wheel assembly back in the roomba and...
...huston, we have a problem!
I wasn't able to reput the wheel articulation pin fully back in place (see the squared pin in the following image)
and the not-in-place pin conflicted with the pin-holder on bottom-cover of the roomba
The Roomba engeneers placed a pin holder on the bottom, like if there was any possibility that the pin could slip out of place by itself... I mean, it took me much effort and many dozens of hammer strokes to push out the pin... in this universe there is no way this pin could slip out by itself :-)
So, let's do some roomba-bottom-cover modding :-)
Before the modding:
After modding with cutter :-)
Nothing will stop me from putting everything back in place :-)
Now my roomba is assembled back together, and is once again going strong! :-)
This Roomba wheel assembly cleaning operations took me between 3 and 4 hours.
Now the wheel is spinning better,
Update: after cleaning some rooms with my roomba, now the cleaned wheel spin very well, it seem to be even smoother than the right wheel.
After all this wheel assembly cleaning operation worked exactly as intended :-)
My roomba model is Roomba 780, but from the image I find online it seem that this wheel assembly module is the same on Roomba 500/600/700 series (Roomba 530 555 560 570 580 620,780, 770, 760)
My roomba is about 13 month old, I use it every week in my home, each week it clean about 5 rooms.
As you may guess, I hate poorly documented guide...I believe that if you are going to make a guide/howto about dismount something, having a lot of Hi-reslutions image is going to help a lot.(you can click any image to see it bigger, or you can CTRL-click any image to see it full-res)
Now, anyone can see what it take to dismount a roomba wheel :-)
If you have a stuck roomba wheel, before deciding to trash it, maybe you can simply try to make 1 or 2 hole in it, and try to clean it's axis :-)
If you can turn the wheel by hand, maybe you can even clean the wheel without dismounting it at all (now that I've dismounted it, I know that :-)
I hope this series of image can be useful to the brave that will venture in the roomba wheel assembly dismounting :-)


