Pages

Monday, December 16, 2013

Android: How to share folder over WiFi and access them from a Windows computer without rooting Android (using a Samba/SMB/CIFS server, a virtual computer, and some port-mapping)

Today I set myself a goal: being able to share a folder over WiFi on my Galaxy S4 (stock, not rooted) and access this shared folder from my computer (running Windows 7).

Everybody will tell you that's not possible because Windows can only access an SMB/CIFS share on the standard TCP port 445, and on a non rooted Android device a normal app can't open port in the 1-1024 range.

On a rooted Android you can use an app like Samba Filesharing for Android and this will start a SMB server on port 445 on you Androi device.
But you need a rooted device, and I don't want to root my Galaxy S4 (not yet).

So on a non-rooted device you can install another SMB server app, like Samba Server, but in this way the SMB service will work on non-standard port, like the TCP port 7777. And Windows computer can't connect to a shared folder on a TCP port other than 445.

But this is only a simple TCP connection on a standard TCP port, so I thought I should be able to map/forward a TCP connection from a port 445 to a port 7777 (the one used by Samba Server), and make it work.

Usually mapping/forwarding a TCP port is a very simple thing on windows, there are tons of free application that can forward a TCP connection.

So the plan looks simple: I will start a connection from my Windows PC to some IP on port 445, then on this IP I should accept this connection and forward it to the IP of the smartphone, on the port 7777.


The question is: where can I setup a service that listen for connections on port 445?
  • On my computer? no, because I need the standard file sharing service up and running to access the shared folder on my smartphone.
  • On my NAS? no, because a nas is meaningless if I can't access it's shared folders.
  • On my router? no, this is not going to work: routers normally will forward connection from WAN to LAN, not from LAN to LAN.
  • On a pfSense running in a Virtualbox? I tried it, but it seem that pfSense have similar limitation of other routers, so forwarding from LAN to LAN doesent works.
  • On a router running DD-WRT? Maybe (I don't know)... as of today the router I use to experiment with DD-WRT it's sitting in my closet waiting for some exciting networking experiment... but not his one: I don't want another hotbox  powered on 24h/day just for accessing a single shared folder on my smartphone...

So I went for another Windows installation, running in VirtualBox.
It turned out that Windows 7 is very attached to it's 445 port, it took me some time to convince Windows to close the 445 TCP port.
But with the help of some post, and some cycle of service-stopping/reboot activity, I've been able to get a Windows PC that doesn't listen on port 445 :-)

Here is a screenshot of the setting/services I modified/disabled in this installation, probably it's not necessary to disable all those service, but I didn't have the time to disable them 1-by-1 and reboot every time...
As you can see from TCPView running in the lower right corner, there are no services listening on port 445 :-)


The rest is easy, fire up a TCP port mapper/forwarder, listen on port 445, forward to port 7777 and you will be able to access the shared folder on your non-rooted android device, from a Windows PC :-)

Here is the portmapper running on my virtualpc
In this experiment I used PortTunnel this is a very-very-old version of the software (when there was free version) but it still works today :-)

As you can guess from the screenshot the IP address of my smartphone is 192.168.157.101, and the IP of my virtualPC is 192.168.157.107.

And in the following screenshot you can see my main computer (192.168.157.110), connected to the shared folder on my Galaxy S4 (192.168.157.101)  (trough the portmapping on the virtualpc (192.168.157.107) )
The address that my computer see is 192.168.157.107, but the data come from the smartphone  (192.168.157.101) trough the portmapping.

and here is a folder with some image, seen from my main PC
and here is the same folder on the smartphone

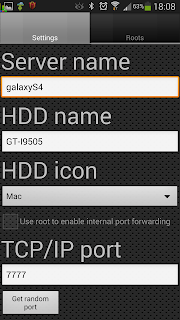
Here is the configuration of the samba server on the smartphone


For this experiment I've tried different Samba server on android, the only one that worked in this configuration is this one, called Samba Server.

So now I can access the shared folder on my non-rooted Galaxy S4.
There is only a tiny issue... it's a bit slow.
Copying data from the PC to the shared folder transfer data at a speed of 1.2 Mb/sec.
Maybe this is due to the software used for the port-mapping...but now I don't have time to try other port-mapping tools.

Anyway... It's not fats, but it works! :-)

Saturday, November 30, 2013

How to flash android factory image without wiping your device - Unbrick your rooted android after a failed OTA update from 4.3 to 4.4 kitkat

I own a Nexus 7 WiFi (2012) on Android 4.3, unlocked and rooted, stock rom.
Long story short: I received the OTA update to android 4.4, I executed the update... and it bricked my Nexus 7.
I've been able to restore my tablet without wiping it by installing the 4.4 factory image.

Installing a factory image will wipe your device, but it's possible to modify the installation script so that it wont delete userdata, nor wipe the device.

About the rooting
When I received the OTA update for 4.4 id didn't unroot before installing it, after all I updated from 4.1 to 4.2 and from 4.2 t 4.3 without unrooting... but this time it didn't work out.
So, keep a note for myself: always unroot before applying system update.
(anyway, this kind of error happened even to person with stock unrooted tablet... so I will never know if the error I got during the update was due to my tablet being rooted)

Fixing the reboot loop
When I got the error my tablet then got stuck in a reboot cycle.
Tablet start up, and then after some time show a "no comand" error, and then reboot, and continue like this...
In this situation I wasn't unable to turn off the tablet, and I didn't want it to drain all the battery.
Looking for a fast and effective way to turn it of, I decided to open it up an detach it's battery: it's an extreme way to get the job done, and (obviously) it worked :-)
Then after some searching I found a better way that doesn't involve dismantling the tablet: simply  push Vol Down + Power at the same time, and if you push then just after the tablet started the boot sequence, this should take you to the Recovery Mode menu, from here you can turn off the tablet: push the VolDown button until you see the "Power Off device" command, and then press the power button.

Reinstalling the update
After some  searching I've decided to simply retry to update the tablet, by sideloading the update with adb.
I've followed this guide.
Here is what I did:
  • I updated my android SDK by using  SDK Manager.exe
    • this may update the driver of your device, so maybe the computer wont see the device when you connect it: in this case you need to go in the "device manager" and force it to update the driver  (you can find the driver in "sdk\extras\google\usb_driver") you need to install the "Android Composite ADB Interface" driver, more info here
  • I downloaded the file update for my tablet (see the linked guide for this)
  • I rebooted my pc
  • I disabled firewall
  • I disabled antivirus
  • I closed any running software (dropbox, skype, gTalk....)
Then I followed the guide: powered on the tablet, go to the recovery mode, open command  prompt on my PC, sideload the update with adb sideload command and... I got another error.
So I wiped the cache from the recovery menu, and tried one more time, just to get the same error again, something like:
Error!

bla...
bla...
bla...

Symlinks and permissions...
set_metadata_recursive: some changes failed
E:Error in /tmp/update.zip
(Status 7)
Installation aborted.
here is a screenshot of the full error message:


Reinstalling the update didn't work out, so I started looking for alternative solutions.
The only solution seemed to be to reinstall a factory image.
The issue with the factory image is that they will wipe your device, and I dont want to wipe my device because reinstalling and reconfiguring all the app take a tons of time (I have about 300 app on my tablet, with file manager, dropbox, synology cloudstation file sync, multiple account, multiple calendars, email, messaging...)

So I decided to try everything I can before doing a factory reset.

After much reading, I understood that it should be possible to install factory image without wiping the device. But to do this, you need to modify the installation script.
The procedure I'm going to describe here is a mix of the information I found on various website on the net.

Keep in mind that this procedure may not work, and it may brick your tablet/phone.
I'm not responsible of any damage/malfunction to your device.
Follow the described steps only if know what you are doing.

Steps to install a factory image without wiping your device
Download the factory image for your device from this page
Decompress it in a folder, and you'll have something like that:

Then you need to edit the "flash-all.bat"
The original "flash-all.bat" looks like this:
@ECHO OFF
:: Copyright 2012 The Android Open Source Project
::
:: Licensed under the Apache License, Version 2.0 (the "License");
:: you may not use this file except in compliance with the License.
:: You may obtain a copy of the License at
::
::      http://www.apache.org/licenses/LICENSE-2.0
::
:: Unless required by applicable law or agreed to in writing, software
:: distributed under the License is distributed on an "AS IS" BASIS,
:: WITHOUT WARRANTIES OR CONDITIONS OF ANY KIND, either express or implied.
:: See the License for the specific language governing permissions and
:: limitations under the License.

PATH=%PATH%;"%SYSTEMROOT%\System32"
fastboot oem unlock
fastboot erase boot
fastboot erase cache
fastboot erase recovery
fastboot erase system
fastboot erase userdata
fastboot flash bootloader bootloader-grouper-4.23.img
fastboot reboot-bootloader
ping -n 10 127.0.0.1 >nul
fastboot -w update image-nakasi-krt16s.zip

echo Press any key to exit...
pause >nul
exit
This installation script will totally wipe your device.
I've highlighted in orange the culprit of the wiping.

The first orange line "fastboot oem unlock" will unlock your device.
I removed this line because I know that my tablet is already unlocked.
I know that unlocking a locked tabled will wipe all user data.

The second orange line "fastboot erase userdata" will erase all user data, to my undestanding this mean deleting your data/image/music/apps. So I removed this line because I want to keep all my user data.

On the last line I've removed the "-w" from the update command, the -w parameter tell the update command to wipe your device. And I don't want to wipe my device.


Here is my modified "flash-all.bat" script
@ECHO OFF
:: Copyright 2012 The Android Open Source Project
::
:: Licensed under the Apache License, Version 2.0 (the "License");
:: you may not use this file except in compliance with the License.
:: You may obtain a copy of the License at
::
::      http://www.apache.org/licenses/LICENSE-2.0
::
:: Unless required by applicable law or agreed to in writing, software
:: distributed under the License is distributed on an "AS IS" BASIS,
:: WITHOUT WARRANTIES OR CONDITIONS OF ANY KIND, either express or implied.
:: See the License for the specific language governing permissions and
:: limitations under the License.

PATH=%PATH%;"%SYSTEMROOT%\System32"
fastboot erase boot
fastboot erase cache
fastboot erase recovery
fastboot erase system
fastboot flash bootloader bootloader-grouper-4.23.img
fastboot reboot-bootloader
ping -n 10 127.0.0.1 >nul
fastboot update image-nakasi-krt16s.zip

echo Press any key to exit...
pause >nul
exit
You CAN'T copy/paste this script, because it include path/filename/command specific for my device factory image (Nexus 7 WiFi v2012 Android 4.4): You should instead edit the script included in the factory image file for you device!
 
KEEP IN MIND THAT I'M NOT AN ANDROID EXPERT.
THIS SCRIPT MAY BRICK YOUR DEVICE

To my understanding maybe this script will work for you if:
  • you are doing a "small" upgrade, like from android 4.3 to android 4.4
  • you device is already unlocked
  • you know the meaning of the following words: adb, sdk, command prompt, bootloader, recovery, locked/unlocked device, flash, partition, cache, firmware, root, mod, rom, hack

 This script probably will not work if:
  • you are doing a big upgrade, like from Android 4.3 to Android 5.0
  • your device is locked

This script is modified to try to not wipe your data, so it's totally possible that it will leave some unneeded file somewhere on your tablet.
I dont know if future OTA update will work. Update: my tablet just received the OTA update to Android 4.4.2, and it worked! :-)

As of today, this modified script saved me a tons of work: now my Nexus 7 is once again up and running, on Android 4.4.
Now it's unrooted, maybe I will try to reroot it in future.

In case you need it, here is a link to the linux version of this script modified in the same way by James Finstrom: it seem he is the only one that did something similar.

Feel free to ask any question in the comments.

Saturday, November 16, 2013

How to protect your Galaxy S4: UAG Case, Iloome Flex screen protector, ShockSock neoprene pouch, and some cardboard

Some month ago I bought my new smartphone: a Samsung Galaxy S4 (GT-I9505).
There are people that change their smartphone each year: there is nothing wrong with that, but I'm not one of those :-)
My previous phone was an HTC S620 (also know as HTC Excalibur) with Windows Mobile 5, then upgraded to WM 6.5.
I bought it in 2006, and kept it for 7 years.

I waited this much mainly because of my check list for my new smartphone:
  • Quad core CPU
  • 2GB of Ram
  • 32GB of internal storage
  • MicroSD
  • Replaceable battery
  • 5" FullHD screen
  • AMOLED screen
  • Decent camera
  • Good community/hacking support
The Galaxy S4 checked all the points on my list, and when I found an online shop selling the 32Gb version at a reasonable price (580€), I bought it :-)

When I pay 580€ for a comput... ehm... a smartphone, I would like it to last some years, so I need to protect it.
A 5" full HD screen will shatter easily if dropped... and phone drops. My HTC s620 got dropped at least one time at year.

So, how do you protect a Samsung Galaxy S4?
After much researching, forum reading, reviews reading... I made the shopping list for protecting my S4:

The case
Let's be honest: aesthetically speaking the Galaxy S4 isn't exactly the most beautiful smartphone.
But to me a smartphone is a tool to use, not something that need to be nice :-)
And I know that my phone will spend it's entire life inside it's case, so it doesn't matter if it's nice or not, I'll only see a touchscreen in a case.
As a case, I went for the Urban Armor Gear Navigator: It's fantastic!
It's very nice, it looks very cool, and have a very good finish.
 
Here are some photos of the S4 inside the Navigator.

Click the images to see them bigger


Now, some detail of the case so you can see the finish of the product.

The volume rocker, very comfortable to use.

 A detail of the volume rocker.

Here is the power button: I must say that the power button on the case is very comfortable to use.
The power button of the Galaxy S4 is ridiculously thin, its about 1mm x 1cm, ad I find it hard to press. With the case, instead, the power button became confortable to use.

 A detail of the external corner of the case

Here is the lower part, with the micro-USB connection, and the mike.

 This is one of the fake screw that are on the back of the case, very well done.


 And this is the UAG logo, on the back of the case.

On the back of the case there are these 4 tiny feet, and they are very useful feature because they accomplish 2 things:
the phone wont slip, and the white part of the phone will never touch the surface where the phone is resting, so it wont scratch easily.


The Screen Protector
I wen for the Iloome Flex (flexible glass) screen protector.
It's very thin (about 0,12mm) and it's compatible with the UAG Case.
Now I don't know if this is really glass, and I don't know if a real glass thick 0,12mm can be made flexible... but surely it seem to be more rigid and protective that the typical plastic-film screen protector.

Now some image of the installed screen protector.


Here is the home button, you can clearly see the very thin screen protector

Here you can see (from center to left) the button, the gorilla glass, the shadow of the screen protector border, and the screen protector. (click the image to see it gibber)

Here is the top part of the phone, the sensor and the camera are all covered by the screen protector: they seem to work without any issue.


Here you can see the screen protector and the top part of the case.
In my opinion, the screen protector go a bit under the case, but this doesn't seem to cause any issue, the UAG case fit perfectly on the phone with and without the Iloome Flex screen protector.
You can also see the shade of the screen protector.
I would like to pint out that the screen protector is perfectly adhering to the GS4 screen, but in these macro shot you still see the shadow of the border of the screen protector due to the thickness of the gorilla glass of the GS4.

Some other photos, done with natural light.
 

The Pouch
I don't feel right with a smartphone hanging around in my shoulder bag with an exposed screen, so I decided to buy a ShockSock neoprene pouch to give the phone a better protection.
I bought the pouch for the size of the LG Optimus G Pro, that is bigger than the GS4, because my S4 is bigger due to the UAG case.

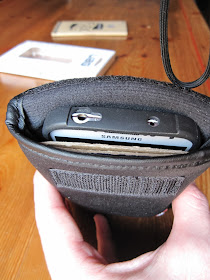
Here are some photos of the pouch.


 And here you can see the size of the pouch respect the size of the Galaxy S4


The Cardboard
Now, I admit being a bit protective with this phone... :-)
I added a rigid piece of cardboard inside the pouch (I did the same in past for my Nexus 7, ad it worked well) just to give extra protection in front of the screen.
When the phone is hanging around in a shoulder bag between coins, home keys, car key, usb-pen drive, wallet, pen, post-it... the protection is never enough :-)

Here is the cardboard, I cut it out from the box of one of the last Christmas presents:-)
It's shaped in this way so that the GS4 wont get stuck when getting it and out from the pouch.

The cardboard are 2 pieces of rigid cardboard folded, and kepth this way with some scotch.
The total thickness is about 2m.

The cardboard is pretty rigid,  it doesn't flex under the weight of the GS4 :-)

The final result

And here you can see the final result from the top: Galaxy S4 inside UAG Case, The pouch, and the cardboard


Alternative Smartphone Case I tried
I used a Cygnett FlipFiber case  it's a very well done case, very slim, very nice to the touch. But it was not enough protective.
I bought an Otterbox Commuter from eBay for what seemed an honest price: don't do it, I've been ripped off, I received a fake Otterbox. If you want a genuine case, buy it directly form the manufacturer.
Anyway, after trying the fake otterbox I found out that the case design is very slippery, so I finally went for the UAG Navigator.

Alternative Screen protector
I pondered long time over which screen protector buy for my S4.
Spigen have many nice tempered glass screen protector for the S4, but I've not been able to find conclusive information abut the compatibility of Spigen screen protector with UAG Case.
So I finally went for the Iloome Flex, because I also liked the idea of having something a bit more flexible than a thin sheet of tempered glass in front of my S4.


Update: The Drop Test!
I can't believe it... one day after I wrote this post, and I dropped my GS4...
I was speaking at the phone, waiting in a queue at the supermarket.
I removed my scarf... and my S4 flied higher than my head, and then felt on the floor face down.
And it's still perfect! It doesn't have a scratch!
I picked up my phone and continued talking, it didn't even drop the call! :-)

The UAG Case + Iloome screen protector worked flawlessly! :-)


Feel free to ask any question in the comments :-)

Saturday, September 28, 2013

Teardown: Black & Decker PD1200 Dustbuster Flexi partial teardown - Battery and charging circuit analyzed

Some month ago I bought a Black & Decker PD1200 Dustbuster Flexi Vacuum cleaner
The Dustbuster Flexi PD120, in all it's glory :-)
Now, the PD1200 is a nice object, useful, functional, well-working... It only has a tiny defect, I've nicknamend it "DarinFast" (a mockup english translation for the italian "ScaricoFacile")
When it was new, the battery lasted 9 minutes... now I'm not brave enough to check them again... but I know batteries are getting worse.

I would like to use it to clean my car... but 9 minutes are not enough...
So today I decided to take a look inside the PD1200, to see if I can find a way to use an external power supply (like a car cigarette lighter).

So here are some shot of a partially dismantled PD1200.
I just opened the lower part, with the battery and the charging circuit.
To open the lower part, you need to remove the 8 screw that hold it to the motor block.
After removing these 8 screws, the lower part can be opened, but it will also detach from the main motor block (so keep a eye on the parts, and don't let them fall on your feet :-) ).

Click the image to see them bigger, these are Full Res photos.

Battery and cable,
The 2 battery pack are connected in series, via the yellow cable.


 Detail of one battery pack, the black wire go straight to the motor.
 
The battery pack can be lifted

 Under the other battery pack you can find the charging circuit.
 

 Some more circuit images

 Lateral photo of the battery pack/circuit/cabling.

Here you can see the connection between the battery block and the motor block.
Kudos to the Black & Decker engineering team for using a detachable connector.

The detached motor block

The detached battery block

Now get to the interesting parts.
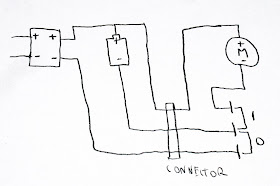
Here you can see a schema of the connections/wires
The first block on the left is the charging circuit, I considered it a "black box" :-)
The wire on the left are the external power connector of the PD1200.

The battery have an interesting connection scheme: the positive wire is always connected to the motor, and to the charging circuit.
The negative wire from the battery get connected to the motor only when you switch on the PD1200
When the PD1200 is switched off, the negative battery wire is connected to the negative wire from the charging circuit.
In the drawing you can see the "connector" that connect the battery block to the motor block.
And the switch (I draw it under the motor) with the 2 possible connection (1 when it's switched on, 0 when it's switched off)
 After looking at the connection scheme I've answered one of my question:
Question: Can I modify something so that the charging connector can be used even as an external power supply?
Answer: No! because the charging connector is not in any way directly connected to the battery, nor to the motor.. and the charging wire between the charging circuit and the battery are much smaller than the wire that power the motor.

So, the only way to use an external power supply is to add another connector.
It should be a connector that interrupt the negative wire from the battery when in use: this way I will be able to leave the positive wire from the new connector always connected to the motor, and still be able to use the switch to turn the engine on and off.

Now here is some photo of a corner of the battery pack, where I think I could place a new connector.


Now I know what I nee to buy to mod my PD1200... :-)

Update: The PD1200 motor is power hungry :-)
Today did some test to check the power requirement of the PD1200 motor.
I detached the battery block from the motor block, and I put a tester between the motor ant the battery, to measure the current used by the motor.
I must say that I'm surprised: the PD1200 consume up to 10A @ 12V
This mean that the PD1200 have a 120W motor.
Now I understand why the PD1200 battery drain so fast, with a discharge current of 10A no battery can last much...

The battery pack inside the PD1200 probably have a capacity around 2000 mAh, this is compatible with the measured discharge time of about 9/10 minutes.

The PD1200 consume the maximum current (10A) when the motor is running at the maximum speed, and it's sucking only air, without obstruction.
If you close the suction tube, the motor run at a higher RPM (because the air pressure get lower, so with the same power it can move faster) and also use less current: with the aspiration hole totally obstructed it require 'only' 6.5A.

Now I know that if I want to use an external power supply, it must be able to give 10A, and must use big enough cable (the cable of the tester I user to check the used current got hot in just some seconds...)


Update: here is a link to an article that show how to change the NiMh batteries with lithium one

Original (in Spanish): http://www.jopapa.me/aspiradoralitio.html

Google-translated in English: https://www-jopapa-me.translate.goog/aspiradoralitio.html?_x_tr_sl=auto&_x_tr_tl=en&_x_tr_hl=it&_x_tr_sch=http