 |
| The Dustbuster Flexi PD120, in all it's glory :-) |
When it was new, the battery lasted 9 minutes... now I'm not brave enough to check them again... but I know batteries are getting worse.
I would like to use it to clean my car... but 9 minutes are not enough...
So today I decided to take a look inside the PD1200, to see if I can find a way to use an external power supply (like a car cigarette lighter).
So here are some shot of a partially dismantled PD1200.
I just opened the lower part, with the battery and the charging circuit.
To open the lower part, you need to remove the 8 screw that hold it to the motor block.
After removing these 8 screws, the lower part can be opened, but it will also detach from the main motor block (so keep a eye on the parts, and don't let them fall on your feet :-) ).
Click the image to see them bigger, these are Full Res photos.
Battery and cable,
The 2 battery pack are connected in series, via the yellow cable.
Detail of one battery pack, the black wire go straight to the motor.
The battery pack can be lifted
Under the other battery pack you can find the charging circuit.
Some more circuit images
Lateral photo of the battery pack/circuit/cabling.
Here you can see the connection between the battery block and the motor block.
Kudos to the Black & Decker engineering team for using a detachable connector.
The detached motor block
The detached battery block
Now get to the interesting parts.
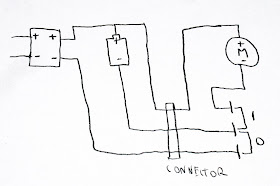
Here you can see a schema of the connections/wires
The first block on the left is the charging circuit, I considered it a "black box" :-)
The wire on the left are the external power connector of the PD1200.
The battery have an interesting connection scheme: the positive wire is always connected to the motor, and to the charging circuit.
The negative wire from the battery get connected to the motor only when you switch on the PD1200
When the PD1200 is switched off, the negative battery wire is connected to the negative wire from the charging circuit.
In the drawing you can see the "connector" that connect the battery block to the motor block.
And the switch (I draw it under the motor) with the 2 possible connection (1 when it's switched on, 0 when it's switched off)
After looking at the connection scheme I've answered one of my question:
Question: Can I modify something so that the charging connector can be used even as an external power supply?
Answer: No! because the charging connector is not in any way directly connected to the battery, nor to the motor.. and the charging wire between the charging circuit and the battery are much smaller than the wire that power the motor.
So, the only way to use an external power supply is to add another connector.
It should be a connector that interrupt the negative wire from the battery when in use: this way I will be able to leave the positive wire from the new connector always connected to the motor, and still be able to use the switch to turn the engine on and off.
Now here is some photo of a corner of the battery pack, where I think I could place a new connector.
Now I know what I nee to buy to mod my PD1200... :-)
Update: The PD1200 motor is power hungry :-)
Today did some test to check the power requirement of the PD1200 motor.
I detached the battery block from the motor block, and I put a tester between the motor ant the battery, to measure the current used by the motor.
I must say that I'm surprised: the PD1200 consume up to 10A @ 12V
This mean that the PD1200 have a 120W motor.
Now I understand why the PD1200 battery drain so fast, with a discharge current of 10A no battery can last much...
The battery pack inside the PD1200 probably have a capacity around 2000 mAh, this is compatible with the measured discharge time of about 9/10 minutes.
The PD1200 consume the maximum current (10A) when the motor is running at the maximum speed, and it's sucking only air, without obstruction.
If you close the suction tube, the motor run at a higher RPM (because the air pressure get lower, so with the same power it can move faster) and also use less current: with the aspiration hole totally obstructed it require 'only' 6.5A.
Now I know that if I want to use an external power supply, it must be able to give 10A, and must use big enough cable (the cable of the tester I user to check the used current got hot in just some seconds...)
Update: here is a link to an article that show how to change the NiMh batteries with lithium one
Original (in Spanish): http://www.jopapa.me/aspiradoralitio.html
Google-translated in English: https://www-jopapa-me.translate.goog/aspiradoralitio.html?_x_tr_sl=auto&_x_tr_tl=en&_x_tr_hl=it&_x_tr_sch=http


